
Toward Continuous Integration
Testing features in iOS is not simple. Not to say that other platforms are, just that App Store constrains everything because any process you want to implement needs to take in consideration the provisioning profiles, devices, etc …
Of course the alternative is to use enterprise tools, but as most of the small companies and freelances won’t go for that option, we need to define a process that can be implemented with those restrictions in mind.
From the many possible options, that works best works for me, is an adaptation on gitflow that can be extended with some integration tools to produce a reliable and smooth experience.
The basis of the workflow is this:
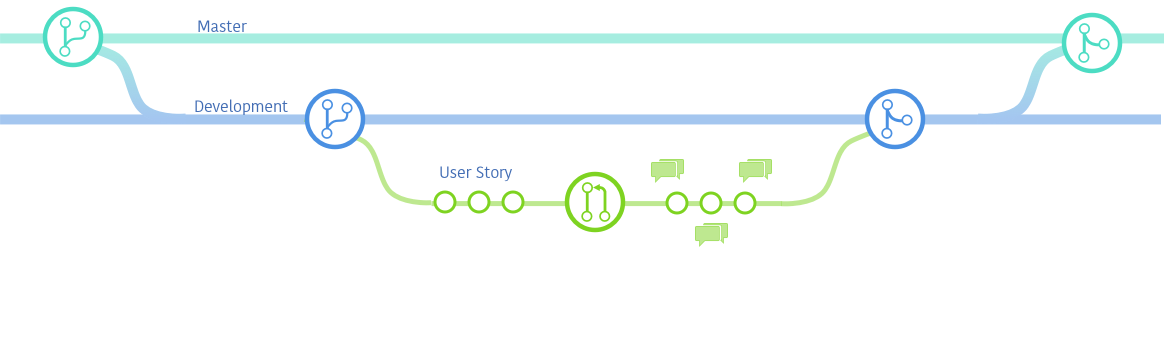
This is the starting point to elaborate the workflow.
Branches
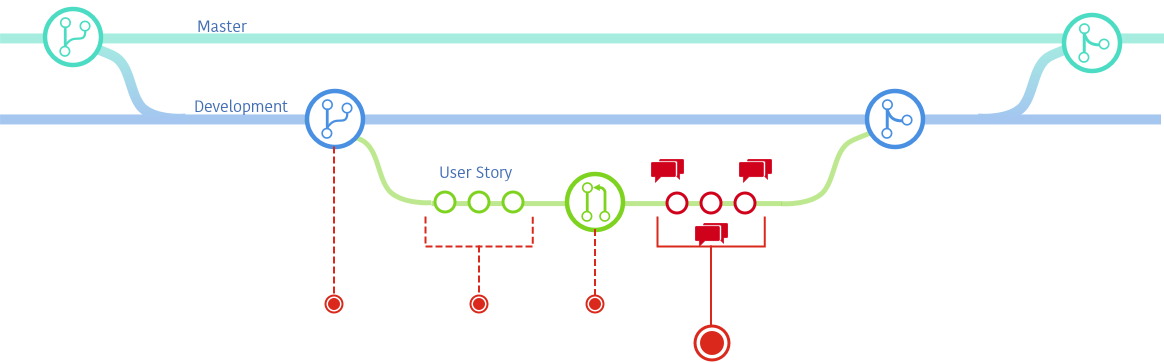
As you can see in the schema, the basics are to work in Feature branches. Feature branches can be tested individually by producing an ipa that can be distributed to a small team of testers almost instantly.
Master
This branch should be reserved to contain a fully tested, code-reviewed and deployable at any time version of the app. The features that have been merged in this branch can only be those that are fully approved and expected to be shipped in the next version.
Ideally Only a merge per release should be made to this branch and only from dev. I say, "ideally" because hot fixes do happen.
This branch is reserved for tagging and building release versions and should never contain features that will not be in the next current public version.
Development
This branch contains the features, user stories, issues and patches that are being developed during an iteration or sprint.
Any merged branch in Development should have been approved by the developers and testers.
Every time a branch is merged into dev, a new Testflight version should be generated and distributed to the test group for integration testing. This is the moment to perform any behaviour testing that has not been automated, or all of them if we are not automating behaviour tests, which is something I wouldn’t recommend.
The merge into Master should happen ideally once per iteration, although You may have a case where a hot fix is needed after the release. In this situation the hot fix will be developed in a hot fix branch ( not different from a Feature branch ) and then merged into Development and from here to Master.
Synchronisation between Master and Development should happen at the beginning of each iteration. This ideally should result in an empty operation, but it is a good sanity check that lets us to be confident that all is starting at the point we expect.
Feature/User Story/Issue/Hot Fix
These kind of branches are all the same kind but their origin is different.
When one of this branches is started, it needs to be branched from Development as they will be merged into Development and we want to avoid merge conflicts as much as possible.
To help with the integration, it is a good practice to have a naming convention that, later on, helps us to relate and check against user stories or issues.
An example of that naming convention could be:
[JIRA STORY ID]_Brief_Description
For example:
IOS-27_Add_login_button
This gives the opportunity of adding a hook in git or a check in fastlane before merging or generating a new test binary.
Workflow
Once we have defined all the elements, next step is to describe with detail the workflow proposal.
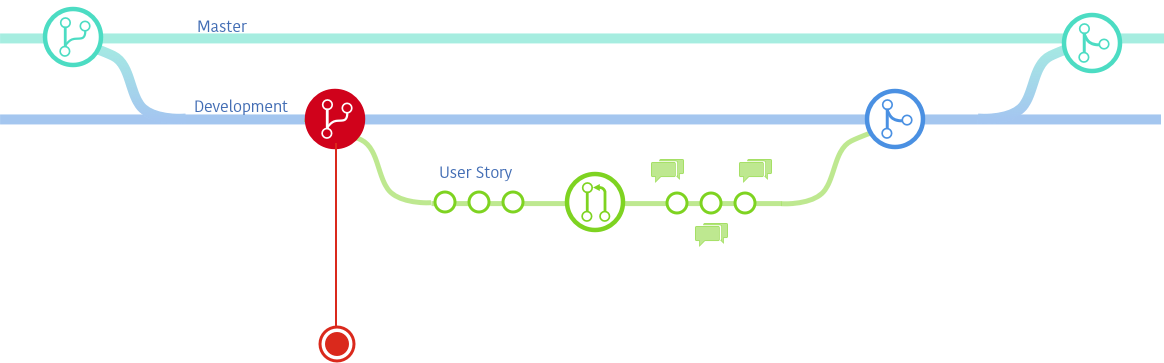
Starting on the basis that Development branch is created and started from Master, the first thing to do at the beginning of any iteration is to synchronise.
$ git checkout development $ git merge master
If all the flow has been properly followed, the result of this merge should be.
Already up-to-date.
It might seem unnecessary, but experience tells me that this safety practice sometimes highlights some issues nobody noticed.
Once everything is ready we can start with our first step.
Starting a User Story/Feature branch
When starting to work on a ticket, we must start branching form Development and name it as agreed before in this post. As you know, branching is cheap in Git, so we shouldn’t be afraid of branching and testing, but always starting form a fresh copy of Development
Working on the branch
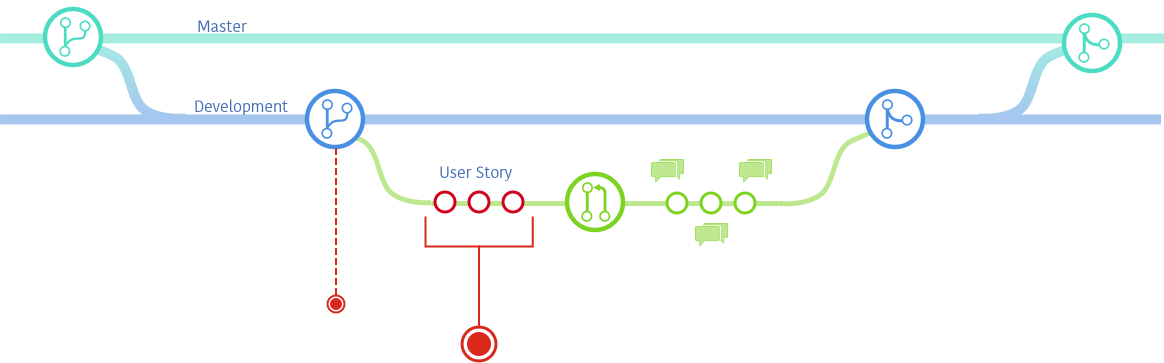
When the feature branch is ready, you can start working on all the changes you need to do.
It is very important to do frequent commits, not only to save your work and to be able to track your progress, but also because commits tell the story of all the process you are following and help others to understand how and why you made the changes decided to make.
Commit messages are also very important and you should take your time to write them. Be clear, direct and concise, use the minimum number of words to define clearly the actions and changes you did. There is a great post about how to write a good commit message here.
Open a pull request
This is the moment when you expose your job to your team mates so they can make a nice code review. By opening a pull request, you basically do two things, first you ask for a code reviewing to be sure you didn’t miss any of the agreements you have with your team on coding style or good practices. Also you show your intention to merge these changes into dev.
If you are a single developer, of course you won’t do a code review, but if you are not alone, it is mandatory to do it and request the approval of your colleagues.
When you are done with all changes you need to perform in this story and your team mates approved the code, it’s time to move it to Ready for QA.
You can’t merge anything before being approved by QA.
There are two things you need to do apart of moving the ticket to Ready for QA. You need to generate a new binary and you need to notify the testers you have something to test.
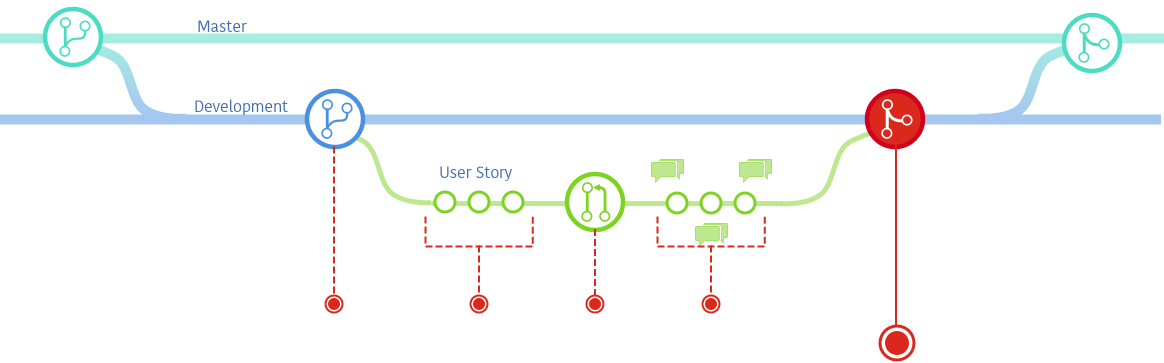
Before doing that, we should ensure that no conflict will happen on the future merge to Development. To avoid this situation, we’ll merge Development into the feature branch. If any conflict appears, we’ll fix it in the branch.
These two things can be done manually, build an ad-hoc version with the right provisioning profile and choose a place to upload it and send emails to the test team saying you have something there to test.
But as always automating things will make everything easier and more reliable. To do that you have two great tools to the rescue fastlane and Fabric. Once you are done with the setup it’s as easy as typing on the command line:
fastlane feature
And that will do all the work for you.
- Bump build number.
- Build the binary.
- Run all tests.
- Upload the binary to Crashlytics.
- Notify all testers that a new version is ready to test and which JIRA ticket is implementing.
Why not use Testflight here? Well, as commented before, we have different test levels and I believe that the speed and options Crashlytics provides is perfect for feature testing. I prefer to keep TestFlight for integration tests.
Refine and test
During this process, the testers should be testing the implemented features in this ticket in isolation and, once happy with the result, mark the ticket as done so the integration into dev can be done.
When any issue is found or there is a misunderstanding, the tester should add his comments to the pull request or JIRA ticket. There is software to help you replicate between both.
When the developer is warned by the system that there is a comment, he or she should work on fixing it. This action will cause a new Crashlytics version that will be sent to test. And this process should be repeated until everybody is happy with the solution.
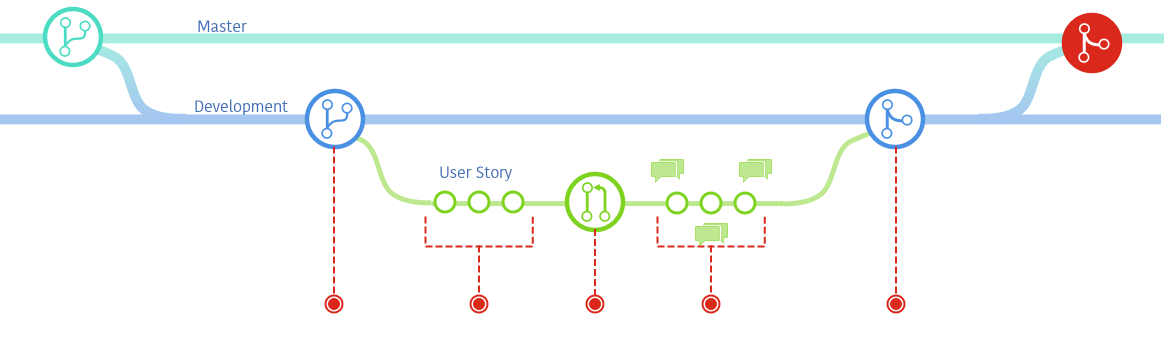
Merge to Development
Once the feature has been tested in isolation, the time to merge into Development has come.
A good practice to do before merging into Development is to merge Development into the feature branch. If any conflicts appear, again, we’ll fix it in the branch.
This is the moment to generate a new binary for integration tests, and in this case we’ll use Testflight to do it.
Again Fastlane comes to the rescue and allows us to automate this process by just calling
fastlane beta
All external testers will be notified that a new beta version is ready to test.
Even though the process has been described for a single ticket, multiple tickets are usually in process at the same time and the synchronisation between them is a collaboration task.
Merge to Master
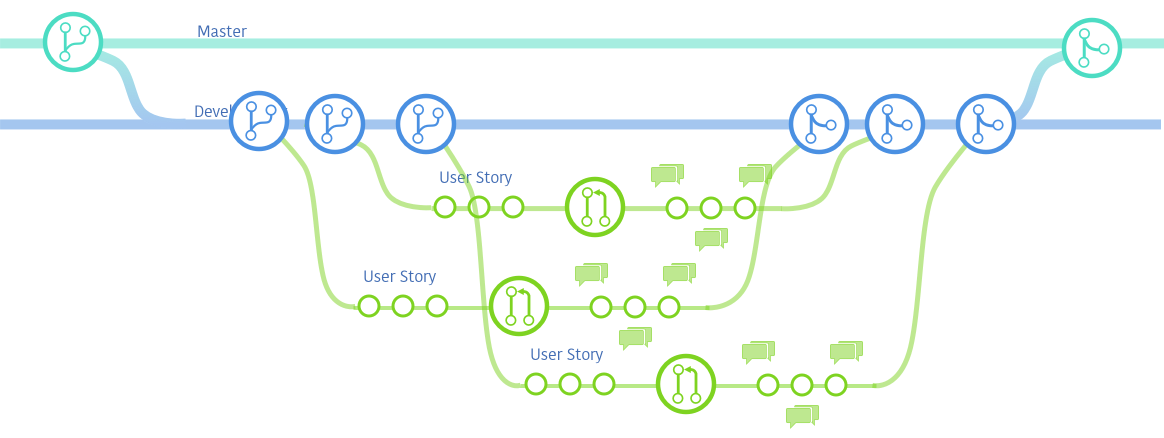
The last step, once all tickets included in the sprint have been merged into Development, all external testers are happy with the results and all integration tests have been done, we should be prepared to create a new release.
This means that all development done in Developent will be integrated into Master and a new version of the app will be sent to the App Store.
As we’ve done with feature branches, and for safety, we should ensure that nothing is going to create conflicts that we might need to fix in Master we should merge Developemnt into Master. In case any conflict happens, should be fixed into Development, repeat integration tests and then, finally merge Development into Master.
Once the merge has been done, we should be building a new release version. The easiest way, once again is to use fast lane to do it.
Future Steps
Once this flow has been implemented and your experience allows you to fix any issue that might appear, then you are ready to explore Fastlane in depth to automate all the processes and avoid mistakes and wrong steps, but this is a topic for another post.