Shape your infrastructure with Terraform

The popularity of cloud infrastructure services has hugely increased over the last few years. Companies value the flexibility and reliability provided by such services. The simplicity of the solutions delivered by cloud providers should remove the burden from the shoulders of busy Dev and Ops people and give the possibility to focus on real customer's needs.

Unfortunately the reality is not necessarily so simple. When you start your journey in the cloud you will discover new challenges. One of these challenges will be connected with the creation and provisioning of your new infrastructure. Simple structures can be created within minutes using web pages or a CLI, but these are not the best ways to create a cloud with 100 machines.

AWS provides many different interfaces which allow automation of an infrastructure process. You can use a REST API or CLI to create your own script. This is probably the most flexible solution, but at the same time it can be time consuming.

Terraform from HashiCorp can give you similar flexibility and at the same time you don't have to spend weeks to write bash or python scripts to provision your cloud.

Terraform for the rescue - plan, apply, update, destroy.

Plan

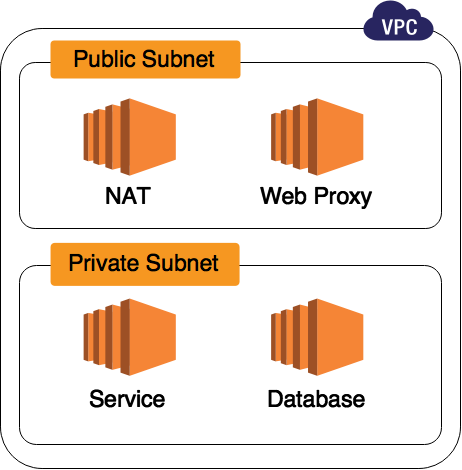
Infrastructure diagram

To demonstrate the use of Terraform we need to introduce some example infrastructure: let's provision a structure which will support a simple web service running in AWS. This web service will expose an API via a web proxy server. The service also requires a database and this database should have a separate EC2 instance to ease database maintenance. Instances responsible for business logic will be hidden in a private subnet and only the web proxy server will be available to the wider internet. At the same time our service needs to connect to external resources - therefore a NAT instance will take the responsibility of managing network connections from within the private subnet. All of these resources will constitute a single Virtual Private Cloud (VPC).

Provider

We are now ready to introduce Terraform. We need to create configuration files which will describe components required to build our infrastructure. Configuration files can be written in HashiCorp Configuration Language (similar to YAML) or JSON. All configuration files should have extension .tf and be stored in the same directory. Terraform automatically combines all resources defined in .tf files.

Before we add any resource we have know where our resources are going to exist. To do that we have to create a provider definition.

Terraform's provider is the mechanism used for managing resources, in our case we'll use the AWS provider. Our first configuration file might look like this:

provider-config.tf


provider "aws" {
    access_key = "ACCESS_KEY_HERE"
    secret_key = "SECRET_KEY_HERE"
    region     = "eu-west-1"
}


Obviously we don't want to keep our secrets in a file which will potentially be stored in version control. We also want to have flexibility when we define a region in which we want to provision our environment. Terraform gives us the possibility to introduce variables.

First we have to declare the variables we want to use (see provider-variables.tf). The variables declaration introduces names, structure and default values for all variables used in the configuration file. We will override these default values later.

provider-variables.tf


variable "provider" {
    default = {
        access_key = "not undefined yet"
        secret_key = "not undefined yet"
        region     = "not undefined yet"
    }
}


Now we can update provider-config.tf.

provider-config.tf


provider "aws" {
    access_key = "${var.provider.access_key}"
    secret_key = "${var.provider.secret_key}"
    region     = "${var.provider.region}"
}


VPC

When we know how to connect to our provider we can introduce resources. A resource definition in Terraform contains information about the type of a resource and its name. Types of resources are predefined by Terraform and represent building elements which we can instantiate in the cloud. Each resource also has a predefined set of config properties which describe the resource in detail. For a full list of supported AWS resource types, see here.

Resource Syntax


resource <TYPE> <NAME> {
    <config_key> = <config_value>
}


In our case we have to define a VPC for all our resources to reside in. We need to assign our VPC to a specific range of addresses by defining a CIDR block. Each VPC also needs an internet gateway.

Once again instead of hardcoded values we will declare variables specific for our VPC definition.

We can also introduce a variable which defines the name of our environment. This name will allow us to tag resources and recognise to which environment a given resource belongs.

environment-variables.tf


variable "environment_name" {
    default = "unknown-environment"
}


vpc-config.tf


> resource "aws_vpc" "environment" { cidr_block = "${var.vpc.cidr_block}"


<span class="nx">tags</span> <span class="p">{</span>
    <span class="nx">Name</span>        <span class="o">=</span> <span class="dl">"</span><span class="s2">${var.environment_name}-vpc</span><span class="dl">"</span>
    <span class="nx">Environment</span> <span class="o">=</span> <span class="dl">"</span><span class="s2">${var.environment_name}</span><span class="dl">"</span>
<span class="p">}</span>

}

resource "aws_internet_gateway" "environment" { vpc_id = "${aws_vpc.environment.id}"

<span class="nx">tags</span> <span class="p">{</span>
    <span class="nx">Name</span>        <span class="o">=</span> <span class="dl">"</span><span class="s2">${var.environment_name}-internet-gateway</span><span class="dl">"</span>
    <span class="nx">Environment</span> <span class="o">=</span> <span class="dl">"</span><span class="s2">${var.environment_name}</span><span class="dl">"</span>
<span class="p">}</span>


vpc-variables.tf


variable "vpc" {
    default = {
        owner_id = "unknown"
        cidr_block = "10.changeit.0.0/16"
    }
}


We can use the type of a resource and its name as a reference variable to access properties exposed by a given resource, as we did to reference the VPC id above. Some properties of a resource will be defined by Terraform during creation of the resource, like internal ids or names. Some are already defined in our scripts.

In the above example we assign an internet gateway to our VPC by referencing the property id of aws_vpc resource with name environment*.

Subnets

Our example VPC should contain two subnets. For each subnet we have to define a range of addresses available (CIDR block), an availability zone and of course we have to assign this subnet to the VPC. Again, we declare variables instead defining values directly in the configuration script.

subnets-config.tf


> resource "aws_subnet" "public-subnet" { vpc_id = "${aws_vpc.environment.id}" cidr_block = "${var.vpc_public_subnet.cidr_block}" availability_zone = "${var.vpc_public_subnet.availability_zone}"


<span class="nx">tags</span> <span class="p">{</span>
    <span class="nx">Name</span>        <span class="o">=</span> <span class="dl">"</span><span class="s2">${var.environment_name}-public-subnet</span><span class="dl">"</span>
    <span class="nx">Environment</span> <span class="o">=</span> <span class="dl">"</span><span class="s2">${var.environment_name}</span><span class="dl">"</span>
<span class="p">}</span>

}

resource "aws_subnet" "private-subnet" { vpc_id = "${aws_vpc.environment.id}" cidr_block = "${var.vpc_private_subnet.cidr_block}" availability_zone = "${var.vpc_private_subnet.availability_zone}"

<span class="nx">tags</span> <span class="p">{</span>
    <span class="nx">Name</span>        <span class="o">=</span> <span class="dl">"</span><span class="s2">${var.environment_name}-private-subnet</span><span class="dl">"</span>
    <span class="nx">Environment</span> <span class="o">=</span> <span class="dl">"</span><span class="s2">${var.environment_name}</span><span class="dl">"</span>
<span class="p">}</span>


subnets-variables.tf


variable "vpc" {
    default = {
        owner_id = "unknown"
        cidr_block = "10.changeit.0.0/16"
    }
}


variable "vpc_public_subnet" { default = { cidr_block = "10.changeit.0.0/24" availability_zone = "changeit" } }


variable "vpc_private_subnet" { default = { cidr_block = "10.changeit.1.0/24" availability_zone = "changeit" } }


Route tables

Each subnet in a VPC must be associated with a route table. This time we have an unusual situation. We have the reference to a resource which was not defined yet (${aws_instance.nat.id}). The order of files is not important for Terraform. It combines all files and based on that knowledge prepares a plan of execution. For that reason we can refer to resources which are defined in different files. Terraform will produce an error during creation if the resource is not defined anywhere.

route_tables-config.tf


> resource "aws_route_table" "public-subnet" { vpc_id = "${aws_vpc.environment.id}"


<span class="nx">route</span> <span class="p">{</span>
    <span class="nx">cidr_block</span> <span class="o">=</span> <span class="dl">"</span><span class="s2">0.0.0.0/0</span><span class="dl">"</span>
    <span class="nx">gateway_id</span> <span class="o">=</span> <span class="dl">"</span><span class="s2">${aws_internet_gateway.environment.id}</span><span class="dl">"</span>
<span class="p">}</span>

<span class="nx">tags</span> <span class="p">{</span>
    <span class="nx">Name</span>        <span class="o">=</span> <span class="dl">"</span><span class="s2">${var.environment_name}-public-subnet-route-table</span><span class="dl">"</span>
    <span class="nx">Environment</span> <span class="o">=</span> <span class="dl">"</span><span class="s2">${var.environment_name}</span><span class="dl">"</span>
<span class="p">}</span>

}

resource "aws_route_table_association" "public-subnet" { subnet_id = "${aws_subnet.public-subnet.id}" route_table_id = "${aws_route_table.public-subnet.id}" }

resource "aws_route_table" "private-subnet" { vpc_id = "${aws_vpc.environment.id}"

<span class="nx">route</span> <span class="p">{</span>
    <span class="nx">cidr_block</span>  <span class="o">=</span> <span class="dl">"</span><span class="s2">0.0.0.0/0</span><span class="dl">"</span>
    <span class="nx">instance_id</span> <span class="o">=</span> <span class="dl">"</span><span class="s2">${aws_instance.nat.id}</span><span class="dl">"</span>
<span class="p">}</span>

<span class="nx">tags</span> <span class="p">{</span>
    <span class="nx">Name</span>        <span class="o">=</span> <span class="dl">"</span><span class="s2">${var.environment_name}-private-subnet-route-table</span><span class="dl">"</span>
    <span class="nx">Environment</span> <span class="o">=</span> <span class="dl">"</span><span class="s2">${var.environment_name}</span><span class="dl">"</span>
<span class="p">}</span>


Security groups

A definition of any EC2 instance requires assigning it to a security group. Security groups are another type of resource in Terraform. Once again configuration of this resource type is straightforward. Depending on our needs we can define inbound (ingress) and outbound (egress) rules for the desired range of ports, protocols and addresses.

security_groups-config.tf


> resource "aws_security_group" "nat" { name = "${var.environment_name}-nat"


<span class="nx">ingress</span> <span class="p">{</span>
    <span class="nx">from_port</span>   <span class="o">=</span> <span class="mi">22</span>
    <span class="nx">to_port</span>     <span class="o">=</span> <span class="mi">22</span>
    <span class="nx">protocol</span>    <span class="o">=</span> <span class="dl">"</span><span class="s2">tcp</span><span class="dl">"</span>
    <span class="nx">cidr_blocks</span> <span class="o">=</span> <span class="p">[</span><span class="dl">"</span><span class="s2">0.0.0.0/0</span><span class="dl">"</span><span class="p">]</span>
<span class="p">}</span>

(...) egress { from_port = 80 to_port = 80 protocol = "tcp" cidr_blocks = ["0.0.0.0/0"] } (...) vpc_id = "${aws_vpc.development_environment.id}" tags { Name = "${var.environment_name}-nat-security-group" Environment = "${var.environment_name}" } }

resource "aws_security_group" "public" { name = "${var.environment_name}-public"

<span class="nx">ingress</span> <span class="p">{</span>
    <span class="nx">from_port</span>   <span class="o">=</span> <span class="mi">22</span>
    <span class="nx">to_port</span>     <span class="o">=</span> <span class="mi">22</span>
    <span class="nx">protocol</span>    <span class="o">=</span> <span class="dl">"</span><span class="s2">tcp</span><span class="dl">"</span>
    <span class="nx">cidr_blocks</span> <span class="o">=</span> <span class="p">[</span><span class="dl">"</span><span class="s2">0.0.0.0/0</span><span class="dl">"</span><span class="p">]</span>
<span class="p">}</span>

(...) egress { from_port = 0 to_port = 0 protocol = "-1" cidr_blocks = ["0.0.0.0/0"] }

<span class="nx">vpc_id</span> <span class="o">=</span> <span class="dl">"</span><span class="s2">${aws_vpc.development_environment.id}</span><span class="dl">"</span>
<span class="nx">tags</span> <span class="p">{</span>
    <span class="nx">Name</span>        <span class="o">=</span> <span class="dl">"</span><span class="s2">${var.environment_name}-public-security-group</span><span class="dl">"</span>
    <span class="nx">Environment</span> <span class="o">=</span> <span class="dl">"</span><span class="s2">${var.environment_name}</span><span class="dl">"</span>
<span class="p">}</span>

}

resource "aws_security_group" "private" { name = "${var.environment_name}-private"

<span class="nx">ingress</span> <span class="p">{</span>
    <span class="nx">from_port</span>   <span class="o">=</span> <span class="mi">22</span>
    <span class="nx">to_port</span>     <span class="o">=</span> <span class="mi">22</span>
    <span class="nx">protocol</span>    <span class="o">=</span> <span class="dl">"</span><span class="s2">tcp</span><span class="dl">"</span>
    <span class="nx">cidr_blocks</span> <span class="o">=</span> <span class="p">[</span><span class="dl">"</span><span class="s2">${var.vpc_public_subnet.cidr_block}</span><span class="dl">"</span><span class="p">]</span>
<span class="p">}</span>

(...) egress { from_port = 0 to_port = 0 protocol = "-1" cidr_blocks = ["0.0.0.0/0"] }

<span class="nx">vpc_id</span> <span class="o">=</span> <span class="dl">"</span><span class="s2">${aws_vpc.development_environment.id}</span><span class="dl">"</span>
<span class="nx">tags</span> <span class="p">{</span>
    <span class="nx">Name</span>        <span class="o">=</span> <span class="dl">"</span><span class="s2">${var.environment_name}-private-security-group</span><span class="dl">"</span>
    <span class="nx">Environment</span> <span class="o">=</span> <span class="dl">"</span><span class="s2">${var.environment_name}</span><span class="dl">"</span>
<span class="p">}</span>


EC2 Instances

With all the above resources declared we can finally define our EC2 instances.

Our NAT instance and web proxy instance require an Elastic IP (resource aws_eip). We also need to choose an instance type for each EC2 instance.

instances-config.tf


> resource "aws_instance" "nat" { ami = "${var.nat.ami_image}" availability_zone = "${var.nat.availability_zone}" instance_type = "t2.micro" key_name = "${var.nat.key_name}" security_groups = ["${aws_security_group.nat.id}"] subnet_id = "${aws_subnet.public-subnet.id}" associate_public_ip_address = true source_dest_check = false


<span class="nx">tags</span> <span class="p">{</span>
    <span class="nx">Name</span>        <span class="o">=</span> <span class="dl">"</span><span class="s2">${var.environment_name}-nat</span><span class="dl">"</span>
    <span class="nx">Environment</span> <span class="o">=</span> <span class="dl">"</span><span class="s2">${var.environment_name}</span><span class="dl">"</span>
<span class="p">}</span>

}

resource "aws_eip" "nat" { instance = "${aws_instance.nat.id}" vpc = true }

resource "aws_instance" "web-proxy" { ami = "${var.web-proxy.ami_image}" availability_zone = "${var.web-proxy.availability_zone}" instance_type = "t2.micro" key_name = "${var.web-proxy.key_name}" security_groups = ["${aws_security_group.public.id}"] subnet_id = "${aws_subnet.public-subnet.id}" associate_public_ip_address = true source_dest_check = true

<span class="nx">tags</span> <span class="p">{</span>
    <span class="nx">Name</span>        <span class="o">=</span> <span class="dl">"</span><span class="s2">${var.environment_name}-web-proxy</span><span class="dl">"</span>
    <span class="nx">Environment</span> <span class="o">=</span> <span class="dl">"</span><span class="s2">${var.environment_name}</span><span class="dl">"</span>
<span class="p">}</span>

}

resource "aws_eip" "web-proxy" { instance = "${aws_instance.web-proxy.id}" vpc = true }

resource "aws_instance" "database" { ami = "${var.database.ami_image}" availability_zone = "${var.database.availability_zone}" instance_type = "t2.micro" key_name = "${var.database.key_name}" security_groups = ["${aws_security_group.private.id}"] subnet_id = "${aws_subnet.private-subnet.id}" associate_public_ip_address = false source_dest_check = true

<span class="nx">tags</span> <span class="p">{</span>
    <span class="nx">Name</span>        <span class="o">=</span> <span class="dl">"</span><span class="s2">${var.environment_name}-database</span><span class="dl">"</span>
    <span class="nx">Environment</span> <span class="o">=</span> <span class="dl">"</span><span class="s2">${var.environment_name}</span><span class="dl">"</span>
<span class="p">}</span>

}

resource "aws_instance" "service" { ami = "${var.services.ami_image}" availability_zone = "${var.services.availability_zone}" instance_type = "t2.micro" key_name = "${var.services.key_name}" security_groups = ["${aws_security_group.private.id}"] subnet_id = "${aws_subnet.private-subnet.id}" associate_public_ip_address = false source_dest_check = true count = 3

<span class="nx">tags</span> <span class="p">{</span>
    <span class="nx">Name</span>        <span class="o">=</span> <span class="dl">"</span><span class="s2">${var.environment_name}-service-${count.index}</span><span class="dl">"</span>
    <span class="nx">Environment</span> <span class="o">=</span> <span class="dl">"</span><span class="s2">${var.environment_name}</span><span class="dl">"</span>
<span class="p">}</span>


instances-variables.tf


variable "nat" {
    default = {
        ami_image         = "ami-14913f63"
        availability_zone = "unknown"
        key_name          = "unknown"
    }
}


variable "web-proxy" { default = { ami_image = "ami-2c90315b" availability_zone = "unknown" key_name = "unknown" } }

variable "database" { default = { ami_image = "ami-2c90315b" availability_zone = "unknown" key_name = "unknown" } }


variable "services" { default = { ami_image = "ami-2c90315b" availability_zone = "unknown" key_name = "unknown" } }


Verify

Our VPC definition is now ready. But how do we know that everything is ready for provisioning? We can verify our all hard work. All we have to do is ask Terraform to prepare a plan by executing the following command:


$ terraform plan


Terraform will combine all available files and prepare an execution plan. This means that all definitions will be verified before you start provisioning your resources. The output from this command will also give us an overview of the kind of operations that will be performed during execution of the plan.

We have to remember that the plan only represents a dry run. We don't connect to AWS at this point and we will not find any errors which might occur in the cloud. For example a plan will not show any errors if you have already exceeded your limit of available EC2 instances.

Apply

So far we used only default values to run our plan. It is not particularly useful when you want to create real environment.

To apply our execution plan we have to prepare a file which will contain the definitions of our variables. We can override default definitions by creating a file with extension .tfvariables. This file has the format of a regular Java property file where each key is the path of a variable and each value is the value assigned to it. An example variable file for our first environment might look like this:

my_first_vpc_environment.tfvariables


environment_name = "my_first_vpc_environment"


provider.access_key = "[MY_REAL_SECRET]" provider.secret_key = "[MY_REAL_SECRET]" provider.region = "eu-west-1"

vpc.owner_id = "[MY_OWNER_ID]" vpc.cidr_block = "10.0.0.0/16"

vpc_public_subnet.cidr_block = "10.0.0.0/24" vpc_public_subnet.availability_zone = "eu-west-1a"

vpc_private_subnet.cidr_block = "10.0.1.0/24" vpc_private_subnet.availability_zone = "eu-west-1a"

nat.key_name = "my_first_vpc_environment" nat.availability_zone = "eu-west-1a"

web-proxy.key_name = "my_first_vpc_environment" web-proxy.availability_zone = "eu-west-1a"

database.key_name = "my_first_vpc_environment" database.availability_zone = "eu-west-1a"


services.key_name = "my_first_vpc_environment" services.availability_zone = "eu-west-1a"


We can verify the plan again and if we decide that we are ready we can apply it by executing the following command:


$ terraform apply


Terraform will now connect to AWS and try to create all resources defined in Terraform scripts. The output of this command is a state file terraform.tfstate which contains all the information about the environment that we just provisioned. At the time of writing the state file must be kept for future execution (e.g. in your version control system), because Terraform uses it to determine differences between cloud state and the current definition stored in your scripts.

Change

Sometimes we have to change our environment. It requires just a change in your definition config. Based on the state of your existing environment and your updated configuration, Terraform is able to prepare a new plan and apply changes to your infrastructure.

You can use the plan and apply commands in the same way as for a new environment. This time Terraform compares the state stored in the state file generated on the initial run, and plans/applies any newly-introduced changes to the configuration.

Destroy

Everything has to come to an end, sometime. When the time comes we can execute this command:


$ terraform destroy


Terraform once again reuses our state file and will remove all resources defined there.

What's next?

In this post we only scratched the surface of Terraform. The AWS provider is one of many providers available. Terraform allows us to combine different providers which give the possibility of provisioning environments across multiple cloud providers.

It also has other basic features. For example outputs give you the possibility to generate files based on any available variables and resource properties. You can use it to generate documentation, config files or just human readable text files.

Now our infrastructure can be managed in code. We can check it into source control, raise pull requests in GitHub and provide living documentation for our environment topology. We can lay the foundation for our deployments and tools like Puppet, Chef and Docker.

All code examples described here can be found on GitHub.